Create a New Stocktake
 The Stocktake Control screen is used to define a new stocktake within your pos application. A stocktake needs to be defined on one machine within the store you are counting. This should either be the Master POS or a POS that is shared to the Master. All other pos lanes within this store use this
new stocktake to record counts against. It is suggested that the pos you define your stocktake on is also used to finalize your stocktake.
- Select New and complete the details. You must give your stocktake a description, and a location must be selected from the list of locations.
- If this stocktake is for single department then choose the department to be counted.
- If a department is selected and counts are recorded for stock not included in the target department then these counts may be lost upon finalising.
- Click OK to proceed once complete. The following ccpurchasing information screen will be displayed.
- Read and Click OK

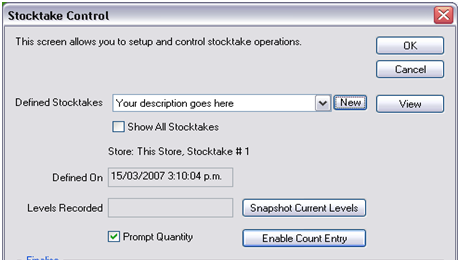
- The Stocktake Control screen will display the description, the date the stocktake was defined on, the stocktake number and store/location selected.

Snapshot Current Levels
 At this point if you are ready to start counting and recording counts against this stocktake, you must take a snapshot of the stock levels currently recorded in the system. This must be done regardless of how accurate or inaccurate you believe the levels are.
- Select the button labeled Snapshot Current Levels.
- The following ccpurchasing information screen will appear, read it and select Yes if you are happy to proceed
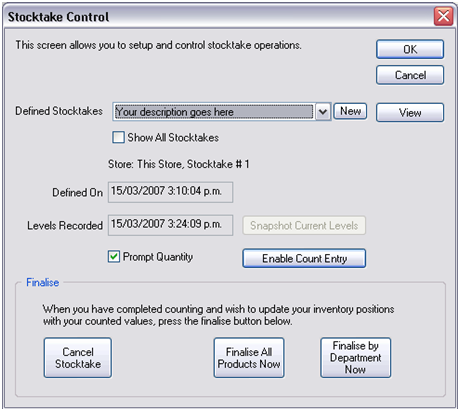
- There may be a delay as the pos application records the current levels in your database. When completed it will return to the Stocktake Control screen. The Snapshot Current Levels button will appear grayed out and a date/time the snapshot occurred will be displayed to you in the Levels Recorded field.
- Exit this screen using the OK button.
- Do not select Enable Count Entry unless this lane is to be used for recording counts.
Recording Counts - Shared Lanes
 Go to a counter, open the pos application and find the Stocktake Control screen.
- The Stocktake Control screen will open, You can now select the stocktake you defined from the Defined Stocktakes drop down field.
- Once you have selected the stocktake, your Stocktake Control window should appear with the same details as was displayed when you completed defining your stocktake.
- To place this counter into stocktake counting mode, select the Enable Count Entry button and then click OK to exit this screen. Once you have selected this option, the Defined Stocktake field will appear grayed out.
- Return to the main Pos selling screen, the background colour of the pos should appear green and white chequed. THIS MEANS YOU ARE IN COUNTING MODE. Any sales completed while the pos is ion this mode will be recorded as stocktake counts.
- You can start entering product as though you were selling it, the pos will prompt you for a qty or weight depending on how the product has been defined in the database. In the top left hand corner of the saleslist the word Stocktake Counts will be displayed. In normal selling mode the sale identification number of the current sale is displayed.
- Periodically cash off the items displayed on your selling screen as though you were paying off a normal sale. Do not cancel the stocktake sale or the counts recorded on screen will be deleted. It is recommend that once stocktake sale reaches about $10000.00, cash it off with your Cash payment option and then start another stocktake sale. Repeat until complete or you need to re enter normal selling mode. You can go in and out of stocktake counting mode as needed.
Recording Counts - Offline Lanes
 Start the pos application on your pos lane and locate the Quickcode button.
- Type the following quickode: 23423514. Your pos will now attempt to pull done the stocktake details from the Master POS that you defined previously. If successful the pos will display a message with the stocktake number and the background colour of the pos should appear with agreen and white chequed pattern. THIS MEANS YOU ARE IN COUNTING MODE.
- To exit Counting Mode, issue the following quickcode:23423523. The background colour of your pos will return to normal. You are now in normal selling mode for this lane.
- To see how many records have been recorded on a lane issue the following quickcode: 23423584. This quickcode will also attempt to send them to the Master POS. A normal "Send Bis" will also send any stocktake counts to the Master POS during the sync process
If you have more than 1 offline pos in your store then it is entirely feasible to place some of your counters in to Counting Mode and leave the remainder in normal selling mode and continue selling.
Viewing Your Counts
 You can view the counts recorded on any lane in a shared database setup.
- To view your current counts simply select the View button located on the Stocktake Control screen. Once you have selected this option the pos will open a Stocktake Review screen.
- This screen displays the counts for each product recorded in the database. Columns are sortable by clicking on the column header.
- If you wish to edit the current count of a product, then click into the blue Stk Count column for the product in question and change the qty to the correct qty.
- There are a number of options/buttons displayed at the top of the Stocktake Review screen. The Filter button allows you to change the display criteria of items displayed. e.g. by department or by supplier. The Options button allows you to add or remove columns in the display area. It also allows you to copy the details on screen to the windows clipboard and paste into excel if prefer.
- There is a Statistics option under the Options button, that when selected will display a $$ for current selection displayed on the view screen.
- The Enter button opens a small window that allows you to directly enter in a product by PLU code, set the qty and save to the current stocktake being viewed. If you use his option to add to your stocktake it must be done prior to finalizing.
Finalising your Stocktake
 Before finalizing your stocktake, you must undertake the following:
- Confirm that the counts recorded are correct, using the view option.
- Confirm all products have been entered.
- All counters are out of "Counting Mode".
To finalize choose one lane preferably the counter used to define the stocktake at the beginning and go into the Stocktake Control screen. Select the stocktake you wish to finalize from the Defined Stocktakes field and then select the Finalize All Products Now button and follow on screen prompts. The pos will set all products counted to the levels entered +/- any other stock related transactions.
Do not select the finalize by Department now button unless a specific department was selected when your stocktake was defined..
Notes:
- A stocktake can be undertaken on shared and offline configurations.
- The file ccpurchasing.dll must reside in the pos folder for that pos node to be able to record counts.
- A stocktake is defined on one pos node and all other shared and offline pos nodes select the stocktake in question to record counts against.
- A stocktake is finalized on one pos after all other pos nodes have been taken out of "counting mode".
- A stocktake is created at one of your counters in store. Counts can be recorded on all your pos retail counters in this store.
- You cannot record counts for Store A in Store B.
- Refrain from receipting new stock into your stores(s) and creating new products while your stocktake is still in progress.
- If you have multiple pos counters in store then you can continue to trade normally on one while the other is used to record counts.
- Dont finalize your stocktake if you are unsure or you have not checked and confirmed you are happy with the counts recorded. The stocktake finalization cannot be reversed once complete.
- Please get in touch if you are unsure of any steps described in this document.
- It is suggested that you enter Counting Mode and enter a couple of test products, then go out of counting mode and check that the counts are recorded in the Stocktake Review screen.
- If this is this is the first time you have defined a stocktake within your store then the following ccpurchasing information screen may be displayed during the defining process. Click Yes to proceed.

