To define the appearance of documents such as emails and statements, Fieldpine uses a template
file that specifies how the document should be presented and what information is to be displayed. This
means you have large amounts of freedom to create documents and branding to suit your own requirements.

When the system needs to create a document, such as a statement for a customer, it opens the
definition "format template" and performs a mail merge like operation inserting the information you
want to appear. This insertion operation is very powerful and allows you to insert complex items such as repeating tables
(ie A list of sales and items on each sale)
Output documents can be in different formats such as Emails (HTML and/or txt), PDF documents or Word documents. Each of these output
types has different abilities so not all output formats will appear exactly as defined in the template. As Word is a very complex
product internally the output formats cannot reproduce every feature Word supports. Word Art (a way of inserting stylised text in a Word document)
is not supported at all and simply ignore if encountered, as an alternative insert a picture containing the Word Art.
Fonts can also cause problems - Word often installs additional fonts but these are not always available on the systems
that finally receive the document.
Using Microsoft Word for Templates
Many document templates are defined using Microsoft Word stored in "DOCX" format. You cannot use
Word documents stored in the older ".DOC" format. You do not need Word to use Message Format files, you only
need it for editing the formats. If you do not have Word you can also use Open Document but this does not yet
support all the features of using Word.
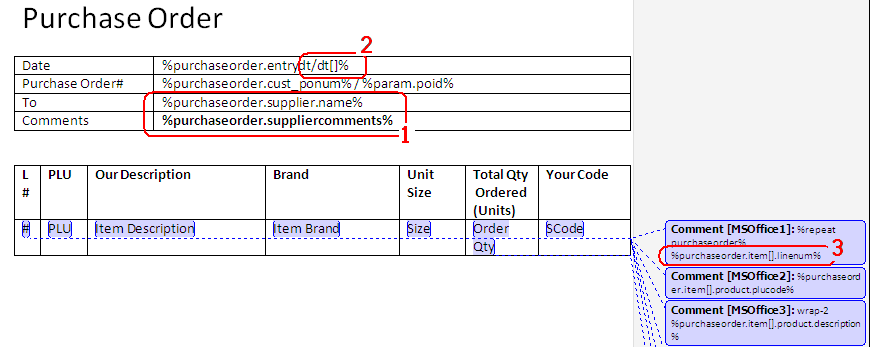
The following picture shows a sample of a simple purchase order, open in Word with Comments enabled, and with some specific elements highlighted
in red. Static elements such as the title are keyed in the format you wish them to be, placed where
you want them.
Literal text, such as the words "Purchase Order" are placed on the output document as close as possible
to how they appear in Word
Simple symbol substitutions, as shown in #1 (red), cause the generating system to extract the value
of defined field name and insert it into the document.
In the example, the system fetchs the suppliercomments information
and inserts into the cell. There are large numbers of these fields
that can be inserted. Refer to the documentation for each object (sale, customer, etc) to see the
list of available attributes
Note how the suppliercomments field is highlighted in bold. Any formatting applied to the tags
themselves, such as bold, italic, underline will be applied to the output generated
Often you wish to control how information is presented, and example #2 (red) shows a format
specification. This specification instructs the system on exactly how the field is to be presented. The
example field is a date and time value, and this format specification is saying "format as a date,
and do not display any time information".
The first two examples, #1 and #2, are showing inline symbols. These are great when the symbol
names themselves do not affect the layout of the page, but when inserting very small fields or tables
these long names can make reading the document hard. To solve this you can insert comments in Word and the
comment contains the format specifications.
Example #3 (red) shows a format specification inserted via a comment. The main word document
has a "#" sign which is linked to the comment. When the document is read, the comment values are
inserted instead of the "#" sign. The use of comments is optional and only exists to make
reading an using documents easier to understand, there is no technical difference between using
comments or the inline method
Additionally, #3 is showing the use of a repeating value. "purchaseorder.item[].linenum" is
the symbol that selects the linenum value for the current item being rendered. As the system repeats
for each item on the purchase order this symbol changes value
Symbol values may be optionally reformatted to a display presentation, which takes the output value and applies
a range of presentation filters before inserting the value for final display. To include a presentation format, place "/format" after the symbol name. For example
%sale.total/$[2]% The part after the slash (/) is called the mask and different
values cause the output to be displayed in different ways
Double or Money Fields
Mask : $[N]
Present the number with
N digits of precision (number of digits after the decimal point). For example a value of 1.456 with a mask of $[2] will display as 1.46
Values receive comma every 3 digits on the leading value portion. eg 1234.56 will display as "1,234.56".
Following the N precision specifier, you can select a style to apply, by using "sX", where X is a number from the table below. If the style
parameter is not supplied the system will chose a system wide default.
| Style# | Brief Description | Example+ | Example- |
| s0 | Simple | 1,234.56 | -1,234.56 |
| s1 | Simple, with currency indicator | $1,234.56 | $-1,234.56 |
| s3 | Simple, with currency indicator after negative indicator | $1,234.56 | -$1,234.56 |
| s4 | Simple, with brackets for negatives | 1,234.56 | (1,234.56) |
| s5 | Simple, with brackets for negatives and currency indicator | $1,234.56 | $(1,234.56) |
| s7 | Simple, with brackets for negatives and currency indicator inside brackets | $1,234.56 | ($1,234.56) |
Example. Format specification of -1234.5612/$[2s3] will produce -$1,234.56 as output.
Double or Money Fields
Mask : dt[style]
Display the value of the date using one of the following formats. The example date of 23 August 2005 and 9 December 2005 is used to show output.
| Format Mask | Example #1 | Example #2 | |
| /dt[d/mmmm/y] | 23/August/2005 | 9/December/2005 |
| /dt[d/mmm/y] | 23/Aug/2005 | 9/Dec/2005 |
| /dt[d/mm/y] | 23/08/2005 | 9/12/2005 |
| /dt[d/m/y] | 23/8/2005 | 9/12/2005 |
| /dt[d mmmm y] | 23 August 2005 | 9 December 2005 |
| /dt[d mmm y] | 23 Aug 2005 | 9 Dec 2005 |
| /dt[d mm y] | 23 08 2005 | 9 12 2005 |
| /dt[d m y] | 23 8 2005 | 9 12 2005 |
| /dt[d-mmmm-y] | 23-August-2005 | 9-December-2005 |
| /dt[d-mmm-y] | 23-Aug-2005 | 9-Dec-2005 | (This is the default format is none is supplied explicitly) |
| /dt[d-mm-y] | 23-08-2005 | 9-12-2005 |
| d-m-y | 23-8-2005 | 9-12-2005 |
String or Text Fields
Mask : txt[option-list]
Option-List is a comma seperated list of effects to be applied to the text, The following are available:
| upper | Convert all text to uppercase (may not work for all foreign languages) |
| lower | Convert all text to lowercase (may not work for all foreign languages) |
| collapse | Remove all whitespace from the text |
| reverse | Reverse the text, so that "ABCD" will display as "DCBA" |
| sentencecase | Convert all letters to lower case, except those that are beginning a sentence or should otherwise have capital letters.
It is impossible for this routine to be correct in all cases for all types of text, so do not expect perfection. |
| wordcase | Convert all text to lowercase, but capitalise the first letter of each word eg "The Cat Ate The Mouse" |
Additional format commands can be used to control output generation beyond what can be
done with Word and Format specifiers alone. This format commands allow you to direct the
generator with precise format requirements. Not all format commands are supported by every
output generator, but equally not all outputs need these commands.
These additional specifiers are typically defined in Word comment blocks. When this is done they
apply only to the text that the comment block generates
Wrap-N

This format command sets how many lines of output are to be generated before ellipsis (...) are added
and the text truncated. The default wrap is "wrap-1" which says that text should not generally wrap.
Wrapping is generally disabled so that long fields do not produce unexpected visual effects. The command
is most commonly seen on fixed width output generators, such as Adobe PDF files
The value of N sets the maximum number of lines before the system stops generating output.
Consider a field with a value of "The quick brown fox jumps over the lazy dog" which is to be displayed into
a table on a page that can only display characters before it exceeds the width of the column
| %field% | will generate » | The quick br... |
| |
| %wrap-2%
%field% | will generate » | The quick brown
fox jumps ov... |
| |
| %wrap-200%
%field% | will generate » | The quick brown
fox jumps over
the lazy dog |
Image-QR


Instructs the
output to convert the current value into a QR code and insert that image.
All the text in the comment field is included in the generated QR code so that
you can include extra data. The example shows how a QR code is generated that
is a URL to a webpage with the current product PID included as well.
Added June 2014
Image-Barcode

Instructs the
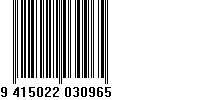
output to convert the current value into a barcode and insert that image.
All the text in the comment field is included in the generated barcode
Values such as product.barcode are normally displayed as text by default, you must
explicitly request a barcode image via this format specifier if you want a scanable barcode
Generated barcodes may not be scanable on all output mediums. There are restrictions on barcode
printing to ensure high reliability scanning and you need to ensure your document is reliable by testing the
actual generated output.
Added June 2014
Adding a line of text
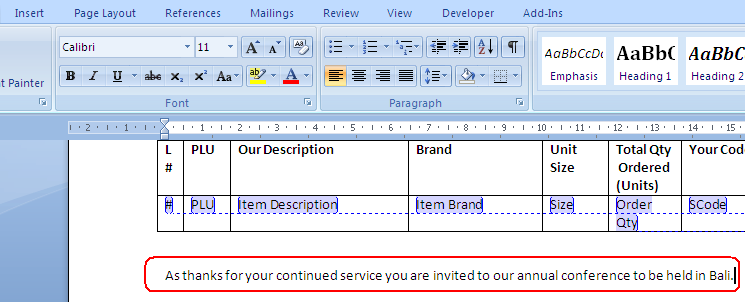
One of the most common operations is simply adding or changing a line of text to be placed on the output. You simply edit
the Microsoft Word document and insert (or remove, edit) the text you wish.
 Open the format file using Microsoft Word
- Using Word, insert the text you wish. The example shows us adding the message circled in red
- Save the Word document and test it works as required.
- You can use Word features such as fonts, italics, bold and so forth, BUT different output generators might handle these features
in different ways so you need to verify it actually works as you want.
Adding dollar signs to amounts
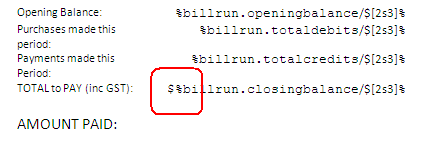
Adding extra symbols and characters is very similar to adding text, simply insert the character you require.
 Open the format file using Microsoft Word
- Using Word, insert the dollar sign. The placement is important, as the string
%billrun.closingbalance/$[2s3]% is a symbol instructing the system to insert the closing balance amount.
The
part .../$[2s3]... is not inserting a dollar sign, rather it is instructing the sytsem on how to format
the monetary value. In the case $[2s3] means "format as money, with 2 decimal places and comma seperating thousands.
- Save the Word document and test it works as required.
Advanced technical information
The files to edit are stored in a subfolder of your system called "Site_messaging". This folder is directly
below where the database is stored. You may create it if it does not exist.
If your site_messaging folder does not have a format, then it searchs the system default formats folder which is located under
the Gds installation folder and called system_messaging. Do not edit the files in the Gds system_messaging folder as this can and will be replaced automatically
by the system.
If your private subfolder does not have the template file you need, copy an example from the system folder to your
folder and edit it there. Once you have copied it the system will always use your format first.
FileNames
Internally format files are numbered, but you can also use named formats in some places. Files should be called
using a specific naming structure so the system can locate your files.
| Area | Format Number | FileName | Alternative FileName |
| Purchase Order | 401 |
MessageFormat401.docx
MessageFormat401.txt |
PurchaseOrder.docx
PurchaseOrder.txt |
| Receipt | 300 |
MessageFormat300.docx
MessageFormat300.txt |
|
| Statement | 108 |
MessageFormat108.docx
MessageFormat108.txt |
|
You must ensure that only one format file exists for each area, if you have two format files (eg messageformat401.docx AND PurchaseOrder.docx) in the same
folder the system will randomly select a file and may change at any time to the other file
PDF Output Documents
If you are creating a statement (format #108) or a sale receipt (format #300) the PDF document
generator can place a watermark image on the background of every page. This image is drawn and scaled to fit the
page. Your formats are responsible for ensuring the output text remains readable - the system does not attempt
to fit around your watermark.
To create a watermark, create a PNG format image and place it in your site_messaging folder. The must be named
exactly as shown in the following table
| Area | Format Number | Watermark FileName |
| Statement | 108 | Watermark_statement.png |
| Receipt | 300 | Watermark_receipt.png |
The system_messaging folder contains some example watermark files but these are not used until they are
copied to your private messaging folder.


 Open the format file using Microsoft Word
 Open the format file using Microsoft Word