NOTE:Your Receipt Printer will need to be connected to your P.C and any correct drivers installed in Windows using the Printer Manufacturers drivers. A Windows Test page must be printed correctly before it can be enabled for use in the Fieldpine Software. Your thermal receipt printer must be ESC/POS command Compatible. See Wikipedia ESC/P for more information. Epson, Bixolon, Saewoo are several printer manufacturers that manufacturer ESC/POS compatible thermal receipt printers.
POSGreen 2016
- Ensure you can successfully print a "Windows Test Page" to the printer before configuring the POS. This test page ensures that all Windows level setup has been correctly configured
- Start your POSGreen application, and select "Menu/Configuration Setup/Printer Setup".
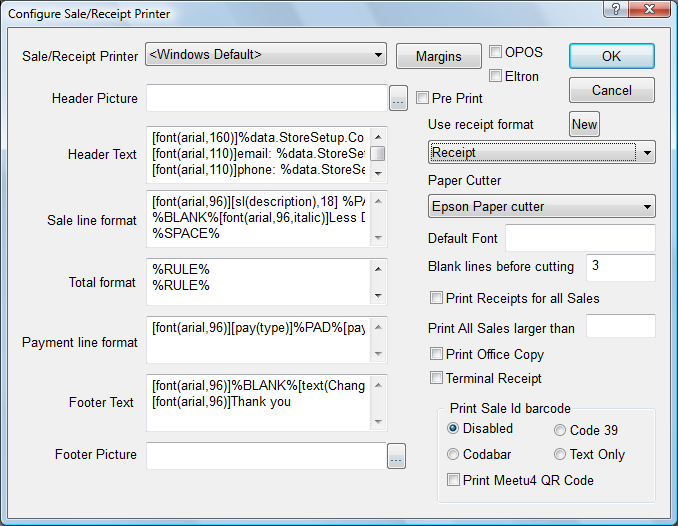
- The "Configure Sale/Receipt Printer" screen will open.

- The two fields that need to be set: "Sale/Receipt Printer" and "Use Receipt Format". A format needs to be linked to a printer and vis versa.
It is possible to have separate formats linked to separate printers.

- Select the printer you wish to use from the "Sale/Receipt Printer" drop down list. Then select the format to use with from the "Use receipt format" drop down list.
If your printer is not visible in the "Sale/Receipt Printer" list, then confirm that is has been connected, powered on and had the necessary drivers installed in windows.
The two formats that need to be linked to a printer for the POS to print a receipt or for a quotation are: "Receipt" and Quotation". - Repeat for each format if you have multiple formats in use.
- Once complete, click "OK" to exit tjhis screen and any others until you return to your main pos screen.
- Restart your POSGreen application to update the changes made above.
There is no need to select or edit other options on this page. A predefined format or layout for each "receipt format" comes with your fieldpine application.
Other POS Verticals / Customised Builds
- Ensure you can successfully print a "Windows Test Page" to the printer before configuring the POS. This test page ensures that all Windows level setup has been correctly configured
- Start your Fieldpine POS application and either select the "Quickcode" button if it existsor using the your keyboard, type the following keystrokes "shift % q".
- The "Run Internal System Function" screen will open.
- Enter the following code "73838 and press "Execute Now".
- The "Configure Sale/Receipt Printer" screen will open.
- Select the "receipt format" you wish to link to a printer from the drop down list. Seelect the printer from the "Sale/Receipt Printer" drop down list.
- Repeat for each format if you have multiple formats in use.
- Once complete, click "OK" to exit tjhis screen and any others until you return to your main pos screen.
- Restart your POSGreen application to update the changes made above.
