Defining Receipt Formats within a Membership
Fieldpine retailers can belong to optional "memberships". The membership owner acts as a central authority and can distribute various settings and data to member stores. A membership is typically used by a franchisor to provide information to franchisees. A single multi store does not use memberships, memberships are more for sharing over different retailers.
| Membership Owner (Franchisor) |
---» | Retailer "Bob" in Perth |
| ---» | Retailer "Mary" in Newcastle |
|
Membership owners can distribute receipt formats. A receipt format is defined using a HTML file defining how the receipt/invoice is laid out. A setting is defined to point to that HTML file.
Step 1 - Create and Deploy Template HTML file
- Create a standard HTML file containing the receipt layout. Use symbols to indicate where site specific values should be inserted. You can find instructions on creating a receipt template at /docs/cfg/ReceiptContent.htm#template
- Place that HTML file in a location that all stores can access. We suggest using cloudflare pages due to high reliability and low cost. However it can be any website that all the stores are able to access
- Verify the URL to access the receipt template. Such as this example https://fieldpine.com/docs/receipts/ProductImages.htm
Step 2 - Define settings in Membership Master Database
- Login to your master membership system
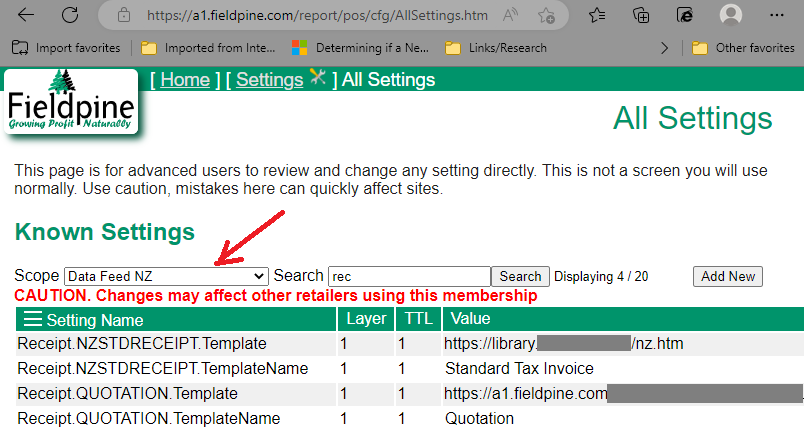
- Under the menu "settings" and then "all settings" the following will be displayed.
- Select the "scope" to use. Other scopes are "local" etc, which only define settings for your local machine. The scope name is whatever the membership name is (Data Feed NZ in this example)
-
Add settings as needed. The syntax is
Receipt.YOUR-ID.Template
where YOUR-ID is a short value (letters and digits only, no spaces etc. Max 32 characters) Set the value to the URL from step 1 above.You can also define an option "Template Name" as shown in the example below.
Step 3 - Check ok, then go to the pub for a beer
- Now connect to a store to check it works.
- Allow a few minutes for the settings to distribute (typically 10 min). Or if impatient, go to "Membership" and click "Download all". This triggers a full background load now
- Now go to "Sales Reports", and "Past Sales Finder".
- Select any sale from the list and click the sale#.
- You should now be looking at the detail of a single sale. Click the "Print" button and the following screen appears . You can see the two receipt templates from Step 2 showing as options.
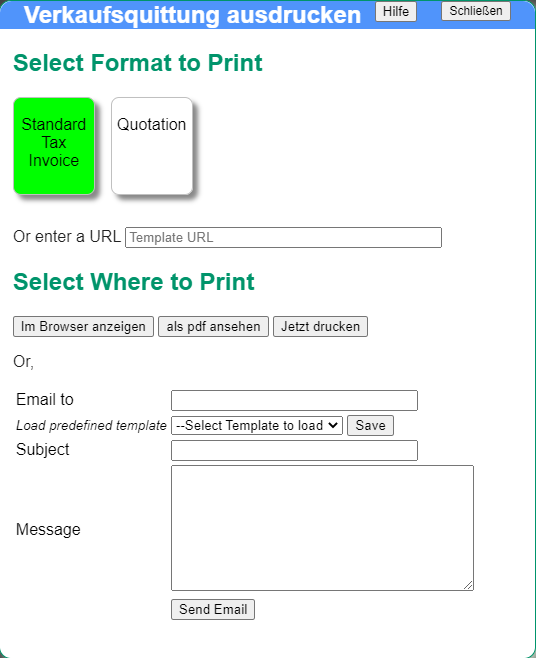
And yes, this screenshot is in German and English. This was taken on a developers machine where they enable German for testing multi lingual options. Yours will only be in English.